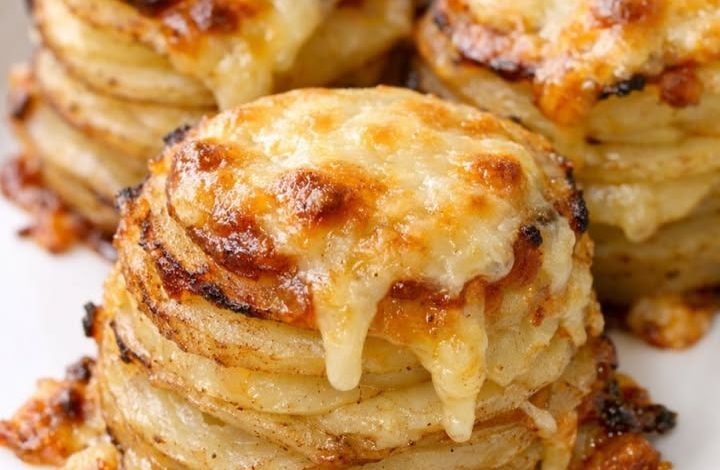
Oven-Baked 4-Ingredient Cheesy Potato Stacks
Let me tell you about the side dish that has quietly become my secret weapon for turning an ordinary dinner into something memorable. It’s the one I make when I need something impressive but don’t want to fuss over complicated techniques or a long ingredient list. These Oven-Baked Cheesy Potato Stacks are pure, simple magic: thinly sliced potatoes layered with melted cheese, brushed with butter, and baked until the edges are golden and crisp while the centers stay tender and creamy. No boiling. No mashing. No fancy equipment. Just slice, stack, and bake. The first time I made these, I wasn’t sure they’d hold together. But when I pulled them from the oven—golden, fragrant, and crackling at the edges—and took that first bite? I knew I’d found my new go-to. They taste like a gourmet bistro side but come together with pantry staples you probably already have. If you’ve ever wanted a potato dish that feels special but fits into your real, busy life? This is your recipe.
What You’ll Need (Yes, Just Four!)
The Core Four:
-
- 4 large russet or Yukon Gold potatoes (about 2 lbs), scrubbed and very thinly sliced (⅛-inch thick)
- 1 ½ cups shredded sharp cheddar, Gruyère, or fontina cheese (avoid pre-shredded for best melting)
- 4 tbsp unsalted butter, melted (or olive oil for dairy-free)
- 1 tsp kosher salt + ½ tsp black pepper (plus garlic powder or dried thyme if you’re feeling fancy)
Optional Boosters (Because Flavor Loves Company):
- 1–2 cloves garlic, minced, brushed onto potatoes before stacking
- Fresh rosemary or thyme leaves tucked between layers for herbal warmth
- A pinch of smoked paprika or red pepper flakes for gentle heat
- Flaky sea salt or chopped chives for finishing
Smart Substitutes & Swaps:
-
- Potato variety: Russets create crispier edges; Yukon Golds stay creamier inside. Both work beautifully.
- Cheese flexibility: Mozzarella for stretch, Parmesan for umami, or a blend for complexity. Just avoid very dry, aged cheeses that don’t melt well.
- Butter alternative: Olive oil, avocado oil, or vegan butter keep it dairy-free.
- Lower sodium? Use unsalted butter and reduce added salt; cheese provides plenty of savory depth.
- Gluten-free? This recipe is naturally gluten-free—just verify your cheese and seasonings.
How to Make Them (Step-by-Step, With Love)
1. Prep Your Pan and Oven Preheat your oven to 400°F (200°C). Lightly grease a 12-cup muffin tin with butter or non-stick spray. For easy removal and perfect presentation, use silicone muffin liners or parchment rounds.
2. Slice the Potatoes Thinly Scrub the potatoes well (peeling is optional—skins add texture and nutrients!). Using a mandoline or a very sharp knife, slice the potatoes as thinly and evenly as possible, about ⅛-inch thick. Uniform slices ensure even cooking and that signature stackable shape.
3. Season and Butter In a large bowl, toss the potato slices with melted butter, salt, and pepper until evenly coated. If adding garlic, herbs, or spices, stir them in now. This step ensures every layer is flavorful and helps the edges crisp beautifully.
4. Build the Stacks Take a small handful of seasoned potato slices (about 8–10 slices) and fan them slightly in your hand. Place the fanned stack into a muffin cup, pressing gently to help them hold their shape. Repeat with remaining potatoes and butter mixture. Don’t worry about perfection—rustic stacks have charm!
5. Add the Cheese Sprinkle about 1–2 tablespoons of shredded cheese over the top of each potato stack, letting some fall between the layers. This creates those irresistible gooey pockets and helps bind the stack together as it bakes.
6. Bake to Golden Perfection Place the muffin tin on the center rack of your preheated oven and bake for 25–35 minutes, until the edges are deep golden brown and crisp, the potatoes are tender when pierced with a fork, and the cheese is bubbly and lightly browned. Rotate the pan halfway through for even browning.
7. Cool and Serve Let the stacks cool in the pan for 5 minutes—this allows them to set slightly for easier removal. Run a small knife around the edges if needed, then gently lift each stack out. Serve warm, garnished with fresh herbs or a pinch of flaky salt if desired.
Pro Tips for Perfect Potato Stacks Every Time
✨ Slice evenly: Uniform potato slices are the secret to even cooking. A mandoline makes this quick and safe, but a sharp knife works too—just take your time.
✨ Don’t overcrowd the muffin tin: Leave space between stacks for air circulation. This ensures crispy edges instead of steamed potatoes.
✨ Press gently when stacking: A light press helps the potatoes hold their shape, but don’t compact them too tightly—they need room to crisp.
✨ Watch the cheese: If the cheese browns too quickly before the potatoes are tender, loosely tent the pan with foil for the last 10 minutes of baking.
✨ Make-ahead friendly: Assemble stacks (without baking) up to 4 hours ahead and refrigerate. Add 5–10 minutes to the bake time if starting from cold.
Serving Ideas That Make Every Meal Special
These stacks are versatile little stars. Here’s how to make them the hero of any gathering:
- Classic comfort: Serve alongside roasted chicken, pork chops, or meatloaf for a hearty, home-style dinner.
- Holiday table: Arrange on a platter with fresh rosemary sprigs for a festive, elegant side that feels special.
- Brunch star: Top with a fried egg and crispy bacon for a decadent morning treat.
- Appetizer twist: Make mini stacks in a mini muffin tin and serve with sour cream or ranch for dipping.
- Kid-approved: Let little hands help fan the potato slices. They’ll beam with pride eating “their” creation.
You Asked, I’m Answering: FAQs
Q: Can I make these without a muffin tin?
A: Yes! Arrange fanned stacks on a parchment-lined baking sheet and bake as directed. They may spread slightly more but will still be delicious.
A: Yes! Arrange fanned stacks on a parchment-lined baking sheet and bake as directed. They may spread slightly more but will still be delicious.
Q: My stacks are soggy. What happened?
A: This usually means the potatoes weren’t sliced thin enough or the oven wasn’t hot enough. Ensure slices are ⅛-inch thick and preheat your oven fully before baking.
A: This usually means the potatoes weren’t sliced thin enough or the oven wasn’t hot enough. Ensure slices are ⅛-inch thick and preheat your oven fully before baking.
Q: Can I use sweet potatoes?
A: Absolutely! Sweet potato stacks are delicious. Just note they may cook slightly faster, so check for doneness at the 20-minute mark.
A: Absolutely! Sweet potato stacks are delicious. Just note they may cook slightly faster, so check for doneness at the 20-minute mark.
Q: How do I store leftovers?
A: Keep cooled stacks in an airtight container in the fridge for up to 3 days. Reheat in a 350°F oven or toaster oven for 8–10 minutes to restore crispness.
A: Keep cooled stacks in an airtight container in the fridge for up to 3 days. Reheat in a 350°F oven or toaster oven for 8–10 minutes to restore crispness.
Q: Can I freeze these?
A: You can freeze baked, cooled stacks in a single layer, then transfer to a bag. Reheat from frozen in a 350°F oven for 15–20 minutes until warmed through.
A: You can freeze baked, cooled stacks in a single layer, then transfer to a bag. Reheat from frozen in a 350°F oven for 15–20 minutes until warmed through.
A Little Note From My Kitchen to Yours
There’s a quiet joy in recipes that ask for so little but give back so much. These Oven-Baked Cheesy Potato Stacks aren’t just a side dish—they’re a gentle reminder that comfort doesn’t have to be complicated. It’s the warmth of a shared table. The satisfaction of feeding people you love. The simple pleasure of knowing that, even on your busiest evenings, you can still create something golden and delicious with just four pantry staples and a little patience.
I’d love to hear how they turn out for you. Did you add a splash of garlic-infused oil? Top them with crispy prosciutto? Drop a comment below and share your twist. And if this little stack of comfort brightens your next meal, please pass it along to someone who deserves a taste of easy, heartfelt hospitality.
Here’s to crispy edges, gooey centers, and the enduring magic of a recipe that feels like home. 🥔🧀✨