Instead of a doormat, this clever woman decided to cut into her floors and do THIS
When it comes to home improvement, our furry friends can sometimes lead us down unexpected paths. Take, for instance, the tale of Lucky the cat and the entry rug that never stood a chance. If you’ve ever dealt with a pet’s playful disregard for floor coverings, you’ll find this story all too relatable. Lucky’s antics not only led to a laminate flooring dilemma but also sparked a creative and practical solution that transformed the entryway into a striking focal point.

In this article, we’ll walk you through a step-by-step guide to tackling your own entryway transformation using hexagon floor tiles. We understand that an entry space needs to be both functional and inviting, capable of withstanding wet and muddy shoes while still adding to the aesthetic appeal of your home. We’ll share a budget-friendly approach that incorporates the durability of porcelain tiles and the artistry of hexagonal patterns.
So, if you’re ready to bid farewell to ruined rugs and embrace a flooring project that seamlessly blends aesthetics and functionality, let’s dive into the process of skipping that entry rug and welcoming a new era of design and practicality.
Supplies:
| SUPPLIES | QUANTITY/TYPE |
|---|---|
| Hexagon floor tile | Mission Stone & Tile |
| Waterproofing membranes | AquaDefense/Schluter Kerdi |
| Rapid-setting thin-set mortar | |
| Grout | |
| Caulk | |
| Tools | |
| Oscillating saw tool | |
| Circular saw | (optional) |
| Tile saw | (for cutting tiles) |
| Caulk gun | |
| Sponge | |
| Disposable brush | |
| Paint stir stick | |
| Baby wipes |
Instructions:
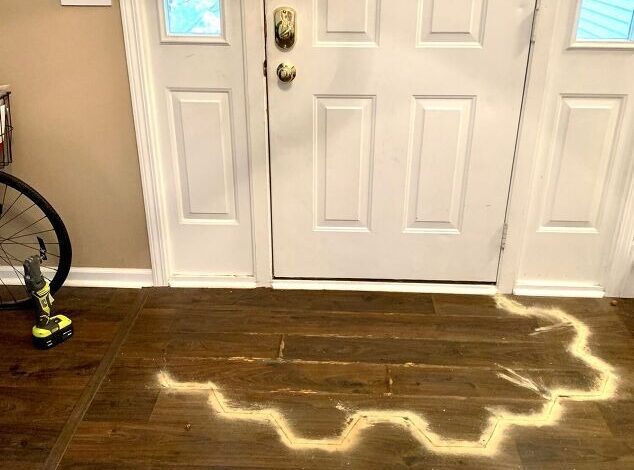
Step 1: Plan tile layout and outline

- Arrange hexagon floor tiles to plan the layout.
- Clean the area and place the tiles over the ruined part of the floor.
- Trace the outline of the tiles’ placement on the floor with a Sharpie marker.
Step 2: Cut out old flooring.

- Use an oscillating saw tool to cut along the traced line and remove the old flooring.
- If using a circular saw for straight cuts, set the depth to avoid cutting into the subfloor.
- Disassemble and remove the old flooring, disposing of it properly.

Step 3: Apply waterproofing.

- Spread Schluter Kerdi membrane over the clean floor space.
- Paint AquaDefense liquid membrane on top of the Kerdi membrane.
- Ensure that the space under the door is waterproofed as well.
Step 4: Mix mortar and lay tile

- Mix rapid-setting thin-set mortar in an ice cream bucket.
- Spread mortar over the floor to create an even level.
- Place the hexagon tiles on the mortar one by one, starting with the edge tiles.
- Adjust tiles for spacing and wipe away any excess mortar.

Step 5: Grout

- Mix grout according to instructions.
- Fill the gaps between tiles with grout, wiping off excess with a wet sponge.
- Use a baby wipe to remove remaining grout film from the tiles.
Step 6: Caulk the edges.

- Use a caulk gun to apply caulk along the edges between the tiles and existing flooring.
- Smooth the caulk with a baby wipe to create a clean finish.
Congratulations! You’ve successfully transformed your entry space with a new tile “rug” that’s durable and stylish. This project not only solves the issue with the ruined flooring but also adds a unique touch to your home’s design.